As part of the continuous improvement, organizations will allocate a certain portion of budget to enhance the capability of processes by upgrading equipment (1-2 years cycle) or entirely enter a step change of re-designing the entire process (7-8 years cycle) to keep up with the industry’s trend.
The same goes for quality control therefore we engage our suppliers or attend exhibitions to look for the latest and best fit in terms of price, ease of use and practicality for our inspection processes. One of our longtime partners are Hexagon and they have a wide range of solutions that may fit our needs.
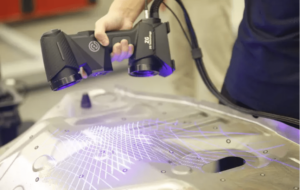
Hexagon recently acquired this company that makes great 3D scanners. ZG’s CereScan is a smart handheld blue laser 3D scanner that can be used for portable metrology-grade 3D scanning. It is designed to simplify the inspection process of very large parts and other irregular, standard or non-standard parts.
CereScan has a built-in photogrammetry system that can improve the volumetric accuracy for scanning big workpieces. Photogrammetry is a technique that uses multiple images taken from different angles to create a 3D model of an object. This setup automatically capture and align these images with its integrated camera and software, which reduces the need for external reference markers and manual alignment.
It can scan dark and shiny parts directly without spraying, thanks to its blue laser technology. Blue laser has a shorter wavelength than red laser, which makes it more suitable for scanning surfaces that are difficult to measure with conventional scanners. The blue laser can also penetrate deeper into the material, which enhances the data quality and accuracy.
Thirdly, the CereScan can capture hard-to-reach places like deep grooves, pockets and holes easily, thanks to its shorter camera distance in mini size. The CereScan has a compact and ergonomic design that allows it to fit into narrow spaces and scan complex geometries. The scanner also has a flexible cable connection that enables it to rotate 360 degrees around the object.
Next, this setup can provide high accuracy of up to 0.01mm under ultra-fine scanning mode. The scanner has four scanning modes that can be adjusted according to the user’s needs and preferences. The ultra-fine mode is ideal for scanning small and delicate parts that require high precision and resolution. The scanner can also switch between single-line and cross-line scanning modes to optimize the scanning speed and coverage.
Last but not least, the CereScan is a versatile and efficient 3D scanning solution that can be used for various applications and industries. The scanner can be integrated with Hexagon’s portable measuring arm devices, which offer flexibility and portability for different inspection scenarios. The scanner can also be used with Hexagon’s 3D software solutions, which provide advanced analysis and reporting functions for the scanned data.
We had one pre-demonstration last year and looking forward for another soon before we prepare proposals for management to review for approval. I’m really excited about this new technology application and hoping it can actually improve our process.
Cheers 🥂 MFR